How to Remove Broken Screw: Quick & Easy Fixes!
Stripped screws can halt any project. They’re stubborn, frustrating, and can seem impossible to remove.
But with the right techniques and tools, you can extract that broken screw and get back to your task without further damage or stress. A broken screw can turn a simple task into a challenge, especially if you’re not equipped with the knowledge to tackle it.
Whether you’re a DIY enthusiast or a seasoned handyman, encountering a snapped or stripped screw head can be an all-too-common obstacle. But don’t let it defeat you. This guide will walk you through several effective methods to remove that pesky broken screw safely and efficiently. From traditional tools to innovative hacks, we’ll cover the steps to help you overcome this hurdle with ease. So, grab your toolbox, and let’s get to work – with a little patience and the right approach, you’ll have that broken screw out in no time.
Related Article: How Does a Torque Wrench Work? – A Complete Guide
Related Article: Can a Power Screwdriver Replace Your Drill? – Quick Guide
Introduction To Broken Screw Dilemmas
Imagine tackling a repair project and hitting a snag. A screw snaps, and frustration mounts. This introduction sheds light on broken screw woes. From stripped heads to corroded bodies, screws can become immovable foes. Knowing how to handle these situations saves time and stress.
The Frustration Of A Stuck Screw
It’s a common issue. Screws get stuck, and tools slip. Stripped heads mock your efforts. The task at hand grinds to a halt. This struggle is real for many. It demands patience and the right approach.
Why Screws Break
Screws break for many reasons. Over-tightening is a culprit. So is metal fatigue. Rust can eat away at the strongest metals. And sometimes, it’s just the wrong screw for the job. Recognizing these causes helps prevent future breaks.
Credit: www.familyhandyman.com
Essential Tools For Screw Removal
Stripped or broken screws can halt any project. Knowing the right tools to remove them is crucial. Let’s dive into the must-have tools for this task.
Standard Tools You Need
Screwdrivers and pliers top the list. A good wrench set is also key. Together, these tools tackle most screw removal jobs.
- Screwdriver set: Various sizes and heads.
- Pliers: For grip and pull.
- Wrench set: To turn tight screws.
- Hammer: Sometimes, a gentle tap helps.
Specialized Gadgets For Stubborn Screws
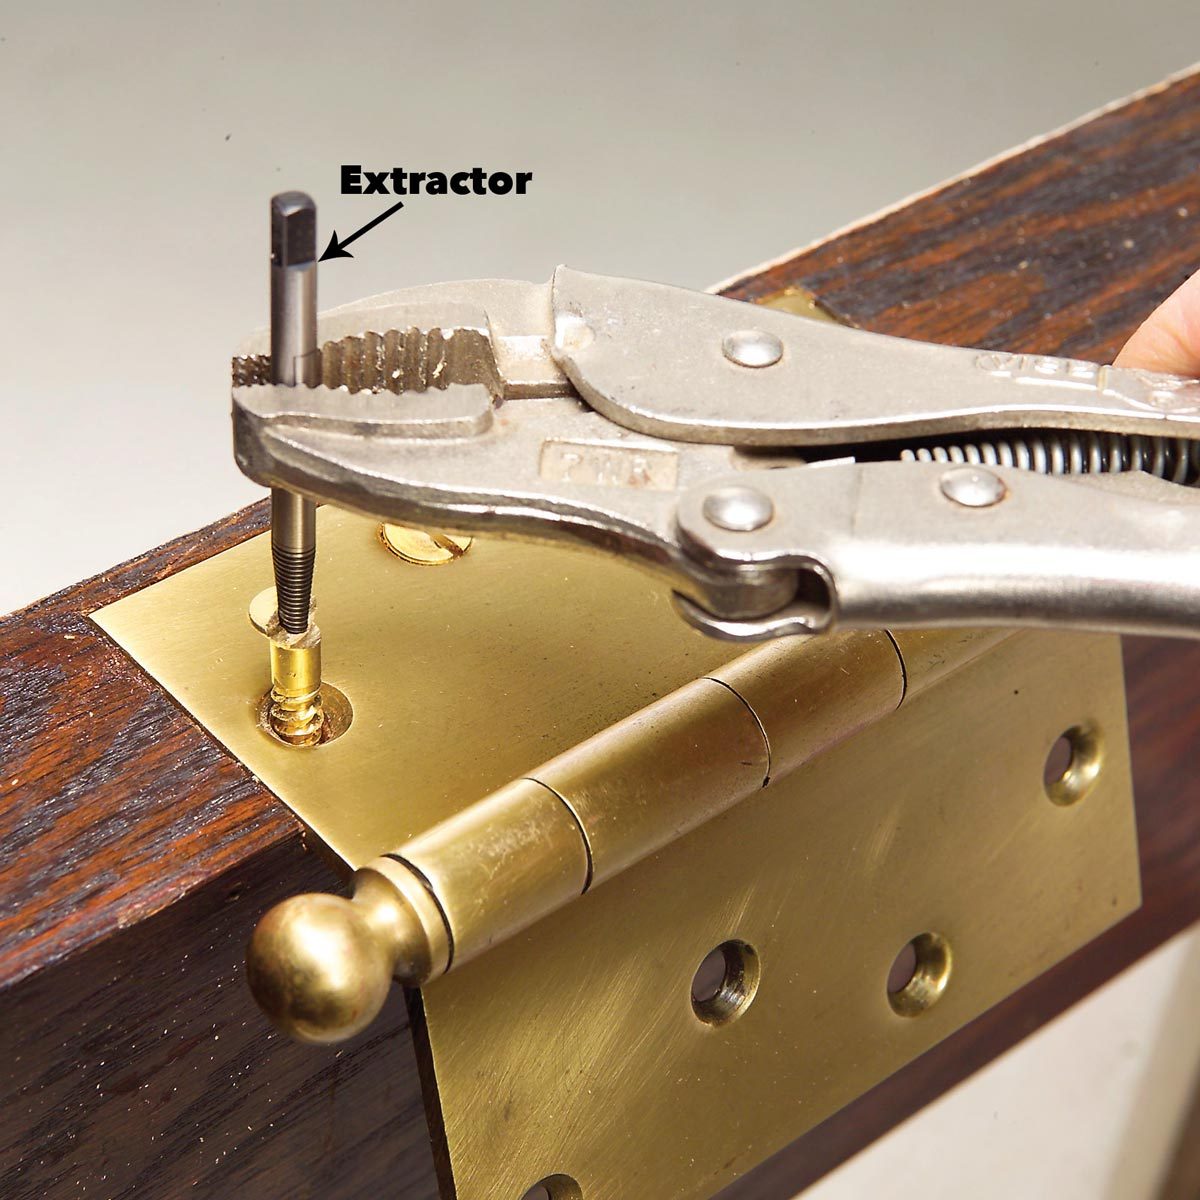
Extractors and left-hand drill bits are lifesavers. They grip and reverse the most stubborn screws.
| Tool | Use |
|---|---|
| Screw Extractor | Removes broken screws. |
| Left-Hand Drill Bit | Helps loosen the screw. |
For screws buried deep, consider a flexible shaft bit holder. It bends to reach tight spots.
- Choose the right size extractor.
- Drill a guidehole if needed.
- Use the extractor to remove the screw.
Remember, patience is key. Use slow, steady pressure to prevent further damage.
Preparation Steps Before Removal
Before removing a broken screw, preparation is key. This ensures a smooth and safe process. Follow these steps carefully.
Safety First: Protective Gear
Always wear the right gear. Safety glasses protect your eyes from tiny metal pieces. Gloves keep your hands safe. This gear is a must.
Setting Up Your Workspace
Choose a clear area. Make sure it’s well-lit. Gather all tools before you start. This keeps the process organized. A tidy space means fewer mistakes.
Related Article: What Does a Jointer Do? Unlocking Woodworking Secrets

Credit: www.youtube.com
Related Article: How to Clean Hand and Power Tools Safely: Your Go-To Guide
Method 1: Using A Screw Extractor
Stripped or broken screws can stop your DIY project in its tracks. Fear not, a screw extractor is your ally here. This simple tool grips and removes even the most stubborn screws. Let’s dive into Method 1: Using a Screw Extractor for hassle-free removal.
Selecting The Right Size Extractor
Size matters for a perfect grip. Start with picking an extractor that matches your screw size. A tight fit is crucial. Too big or small, and you won’t get that screw out. Test a couple of sizes. Find the one that sits snugly in the screw head.
Step-by-step Extraction Process
First, create a guide hole. Use a drill and make a small indentation. This helps the extractor sit properly. Next, tap the extractor into the hole. A hammer does this job well. Just a few gentle taps should do it. Now, twist the extractor with a wrench. Turn it counterclockwise. Slow and steady wins this race. The extractor will catch it. Soon, the broken screw will come out. Victory!
Method 2: The Rubber Band Trick
Stuck with a stripped screw? Don’t worry. The rubber band trick is a simple, yet effective method to remove a broken screw. No need for complex tools – just a rubber band and your screwdriver. This technique provides extra grip by filling the stripped head of the screw.
How A Simple Rubber Band Can Help
When a screw head is damaged, it can lose grip. A rubber band acts as a layer between the screwdriver and the screw. This creates friction. The rubber molds into the gaps, allowing the screwdriver to turn the screw.
Applying The Method Correctly
- Choose a flat rubber band.
- Place it flat over the screw head.
- Press the screwdriver tip onto the band and into the screw head.
- Turn slowly with firm pressure.
- Keep steady force until the screw moves.
Success depends on steady, even pressure. Take your time. With patience, the screw should come out.
Related Article: The 9 Best Tool Bags 2025 for Professional Users
:max_bytes(150000):strip_icc()/194AskWOOD3-2d42915ecb874b478819319990249c27.jpg)
Credit: www.woodmagazine.com
Related Article: The Ultimate Guide to Different Types of Wrenches
Method 3: Employing Chemical Solutions
Removing a broken screw can be tough. Method 3: Employing Chemical Solutions is another way. It works well for stuck screws.
Choosing The Right Chemical
First, pick a good chemical. Not all work the same. Use one made for loosening screws. Penetrating oils are a top choice. They seep into tiny spaces. This makes the screw easier to remove.
Application Technique For Best Results
How you apply the chemical matters. Follow these steps for the best outcome:
- Clean the area. This helps the chemical work better.
- Apply the chemical. Use a dropper or brush. Make sure it covers the screw head and goes into the threads.
- Wait for the chemical to work. This can take several hours. Be patient.
- Try to remove the screw. Use the right tool. Turn slowly.
Remember, safety first. Wear gloves and work in a well-ventilated area.
| Step | Action | Tips |
|---|---|---|
| 1 | Clean Area | Removes grease, improves effectiveness |
| 2 | Apply Chemical | Turn slowly, and use the right tool |
| 3 | Wait | Give it time to work |
| 4 | Remove Screw | Turn slowly, use the right tool |
Aftercare And Prevention
After you remove a broken screw, thorough cleaning is key. To avoid future issues, regular inspections and proper tool use are essential.
After removing a broken screw, proper aftercare ensures no further damage occurs. It’s also crucial to take steps to prevent similar issues in the future. The right strategies can help maintain the integrity of your materials and tools. Here’s how to treat the area and tips to avoid future breakage.
Treating The Affected Area
Once the broken screw is out, inspect the hole closely. Look for any damage or remaining debris. Use a vacuum to clear out any metal filings or wood fragments. If the material is wood, use wood filler to patch the hole. Allow it to dry completely. Sand the area smoothly if necessary. For metal, a thread repair kit can fix the threads. Always clean the area with a cloth after the repair. This ensures a clean surface for the next screw.
Tips To Avoid Future Screw Breakage
Choose the right screw for the job. Match the size and material to the workpiece. Use a pilot hole to reduce stress on the screw. It helps guide the screw and prevents splitting. Do not over-tighten. This can weaken the screw and cause it to snap. Use quality tools that fit the screw heads properly. Poorly fitting tools can strip the screw head. Keep screws away from excessive moisture. It can cause rust and weaken the screw. Regularly check for signs of wear or damage. Replace screws as needed to avoid breakage. Remember, careful maintenance and proper use are key to screw longevity.
Related Article: Tools Every Man Needs: Power Up Your Toolkit!
To watch How to Remove Broken Screw>>
Conclusion
Removing a broken screw need not be a nightmare. With the right tools and steps, you can tackle this task smoothly. Remember, patience is key. Gently work the extractor to avoid further damage. Practice safety and choose the correct method for your situation.
These tips will help you succeed without causing harm to your materials. Next time a screw breaks, you’ll know exactly what to do. Ready to fix things up? Give it a try and see the difference!
Related Article: Best Hand Tools for Beginners to Complete Tasks Easily
You may also read: How to Unscrew Broken Screw: Expert Tips and Tricks
